Product demo.
  What is data observability?
  What is a data mesh--and how not to mesh it up
  The ULTIMATE Guide To Data Lineage
 3 Simple Steps For Snowflake Cost Optimization Without Getting Too Crazy


Matt Sulkis
Matt is the head of partnerships at Monte Carlo.

Francisco Alberini
Francisco is a product manager at Monte Carlo.
Most data pros know Snowflake’s pricing model is consumption based–you pay for what you use. What many don’t know is Snowflake actually WANTS you to optimize your costs and has provided helpful features to rightsize your consumption.
Waste isn’t good for anyone. Instead of spinning cycles on deteriorated SQL queries, the data cloud provider would rather have you focus those Snowflake credits toward projects like building data apps.
These types of projects provide higher value to your business… and not so coincidentally make their solution stickier and lead to more sustainable increased consumption in the long-term.
The key with Snowflake cost optimization initiatives is they too need to be right sized.
Too light a touch, and your monthly bill will eventually catch the wandering gaze of your CTO or CFO. Cut corners too hard and you could introduce reliability or quality issues that cost more than that $1.25 you were trying to save.

In that spirit, we have put together a simple three step plan for Snowflake cost optimization without getting too crazy.
Table of Contents
Snowflake pricing: how the model works
To understand Snowflake cost optimization strategies and best practices, you first need to know how the consumption based pricing model works.
Actual pricing depends on a few different variables such as the cloud provider, region, plan type, services, and more. Since we’re not getting too crazy, we will oversimplify a bit.
Essentially, your Snowflake cost is based on the actual monthly usage of three separate items: storage, compute, and cloud services. You will be charged for any Snowflake serverless features you use as well.
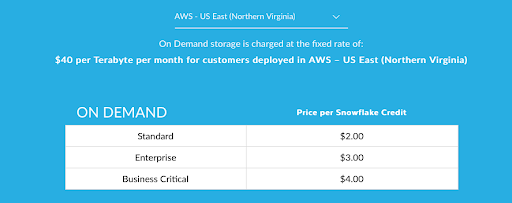
Most customers pay on-demand with Snowflake credits, but you can pre-purchase capacity as well. For example, the on-demand pricing in the AWS-US East region as of April 2022 is $40 per terabyte per month with Snowflake credits priced at $2.00, $3.00, or $4.00 respectively depending on which plan (Standard, Enterprise, Business Critical) was selected.
Snowflake also offers dynamic pricing. Snowflake dynamic pricing will adjust prices in real time to help retailers maximize the profitability of each unit sold, based on inventory levels, competitors’ pricing, and current trends in consumer demand.
This can seem a bit abstract and intimidating at first glance. Converting your average workload into expected Snowflake credit spend takes a bit of math (and what is the conversion of Snowflake credits to Shrute bucks?).
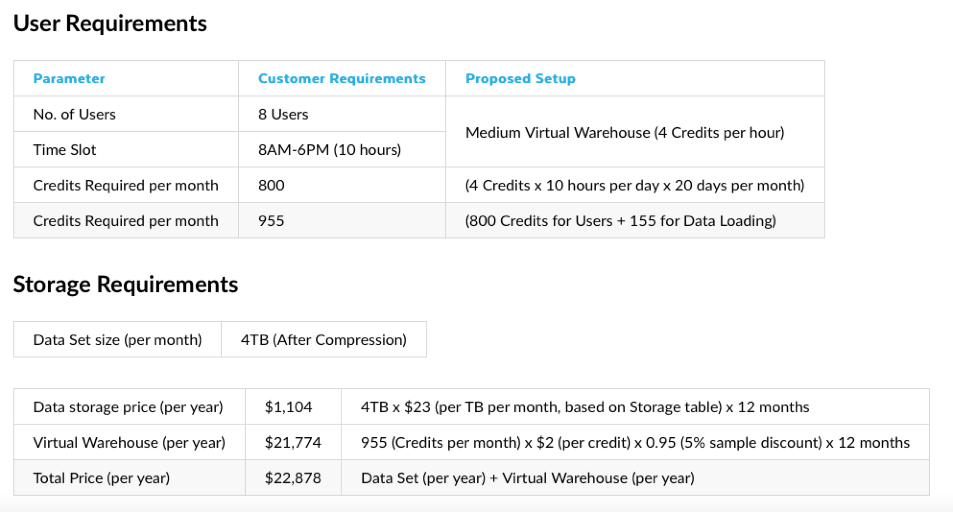
Luckily, there are a number of third-party calculators and Snowflake provides several examples in their pricing guide. Here is one example from the guide that shows expected credit consumption from a fictitious company with 8 users storing 4 Terabytes of data and working across two virtual data warehouses:
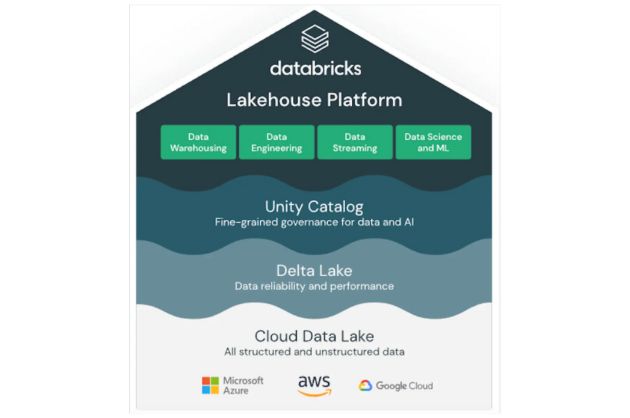
Databricks offers a similar pay-as-you-go approach. You can read the full Databricks pricing model here. BigQuery pricing has two main components: on-demYand compute pricing, or the cost to process queries, and storage pricing, the cost to store the data that you load into BigQuery.
If you’re transferring data from a Snowflake account into a different region on the same cloud platform or into a completely different cloud platform, Snowflake will charge a per-byte fee for data egress.
Is there a Snowflake object that does not consume any storage costs?
You can get started with Snowflake for free with a trial account, and the balance of your free usage decreases as you consume credits to use compute and accrue storage costs.
In addition, temporary and transient tables do not incur the same fees as standard permanent tables. This helps to manage the storage costs associated with time travel and fail-safe.

All of this is to say that Snowflake pricing is mainly driven by credit consumption, which is mainly driven by storage and compute; which is mainly driven by the amount of tables in your environment, the SQL queries being run on those tables, and the sizes of your data warehouses.
That is why our Snowflake cost optimization strategy will focus on optimizing those three areas by leveraging native features, best practices, and other solutions.
Step 1: Snowflake warehouse size optimization
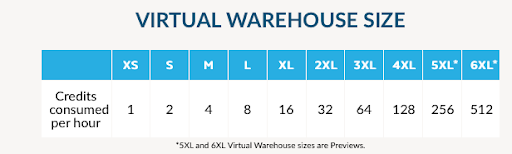
Snowflake virtual warehouses come in 10 sizes. The larger the warehouse the more credits it consumes per hour of actively running queries.
You might assume the best Snowflake cost optimization strategy would be to keep your warehouse as small as possible, but that’s not necessarily true. That’s because the larger data warehouses also run queries faster.
There isn’t a magical formula for how to optimize warehouse size for your typical workloads–it’s a process of trial and error. That being said, there are some Snowflake cost optimization best practices related to rightsizing your warehouse.
Group similar workloads in the same virtual warehouse
Grouping similar workloads is how Snowflake runs its own internal instance. It’s an effective strategy because you can tailor configuration settings that impact efficiency without worrying about cutting too deep. These settings include auto-suspend, auto-resume, scaling policy, clusters, and statement timeout.
For example, the default Snowflake auto-suspend policy is 600 seconds, but that can be adjusted as low as 60 seconds by running a SQL statement.
This is a great example of how you can “get too crazy” with Snowflake cost optimization because if you set the auto-suspend more tightly than any gaps in your query workload, the warehouse could end up in a continual state of auto-suspend and auto-resume.
In fact, Snowflake recommends considering disabling auto-suspend for a warehouse if there are heavy, steady workloads on the warehouse or you want availability with no lag time.
Essentially, this strategy comes down to making sure you have the right configuration for the right workload.
Leverage data SLAs to define workloads and value to business
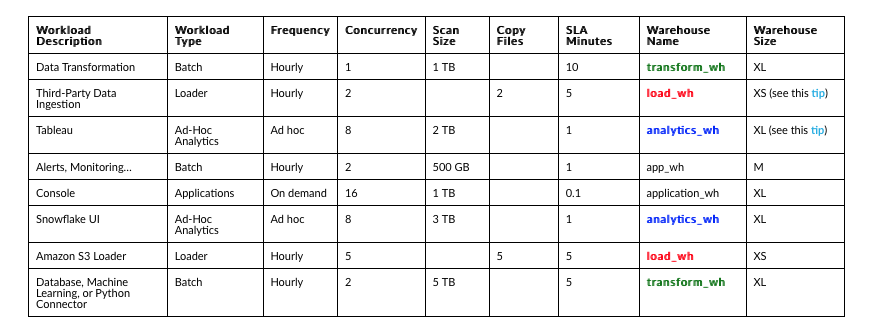
You’ve decided to group similar workloads in the same virtual warehouse. Great! But first you need to do the hard part–talking to business stakeholders to properly scope workloads and set SLAs.
While you can look at your logs to determine workload type, frequency, typical scan size, etc., what you can’t determine without talking to your business stakeholders is the expectations for data freshness and its true value to the business.
If you’re feeling fancy, this can also help you implement a chargeback model to assign spending to different data products or domains.
If you’re not sure where to start with setting data SLAs, check out this article from Red Ventures senior data scientist Brandon Beidel on how he approached the task.
Start small and right size utilization
Once you have your workloads grouped together, err on the side of selecting a smaller warehouse and begin the trial and error process.
Snowflake recommends, “The queries you experiment with should be of a size and complexity that you know will typically complete within 5 to 10 minutes (or less).”
You’ll also want to monitor your queue to make sure jobs aren’t spending an inordinate amount of time waiting their turn as the overall workload will take longer to execute and consume more credits.
Set resource and volume monitors
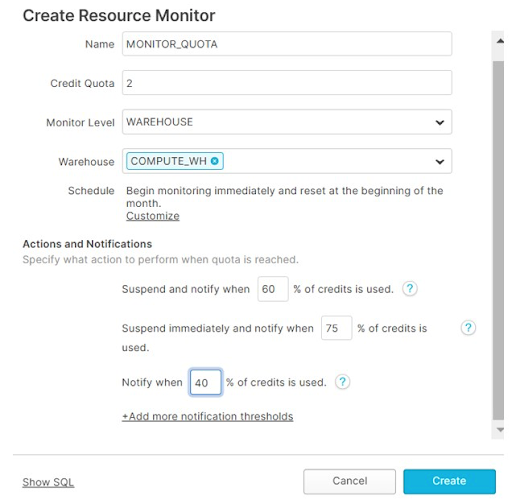
You’ve grouped your workloads and rightsized your warehouses, now you want to set some proactive monitors to alert you if the train starts to go off the rails. This is where Snowflake resource monitors can be helpful.
Resource monitors can automatically terminate all activity or simply notify the team when consumption thresholds are being reached. We strongly recommend setting notification thresholds somewhere below your hard limit to ensure capacity doesn’t become an issue.
Even notification monitors can be too little too late.
For example, your data source may have an issue turning 5 million rows into 200 million. The resulting consumption may be below your resource monitor threshold, but after a few repeated ingestions your capacity may start to get swallowed up quick–and by bad data no less!
This is where data observability tools like Monte Carlo come in handy not just for your Snowflake environment but across your entire data stack.
Our platform automatically monitors for volume anomalies (as well as freshness, schema, and distribution).
For example, Monte Carlo alerted the Hotjar team that as a result of a data issue they were almost at 80% of their Segment MTU capacity. The alert came in 8 days before they would have been alerted by Segment, helping the team reduce their infrastructure cost by a third.
Step 2: Snowflake query optimization
Snowflake does not charge per query. However, for the time that data is being queried, Snowflake credits are being consumed. Query optimization cost is the process of optimizing and streamling queries to achieve optimal performance, minimize the use of resources, and reduce Snowflake storage costs.
The Snowflake cost optimization trick here is to optimize query code and other settings to enable smoother operations without compromising the integrity of any jobs. You also don’t want to reach the point where the time your data engineers are optimizing code is more expensive than the jobs themselves.
Best practices for optimizing Snowflake queries could be an entirely separate blog and were not getting too crazy, so we will focus our attention here on how to leverage helpful features to identify costly outliers.
We will also assume you have optimized your session timeout, queue, and other warehouse settings discussed in the previous section.
Using query tags
The QUERY_TAG can be used to tag queries and SQL statements executed within a session, oftentimes related to the type of workload.
By leveraging this best practice consistently, your team can more easily spot trends, outliers, and issues with your data pipeline. The challenge, of course, is your team actually has to use it consistently.
Identifying most expensive, deteriorating, and heavy queries
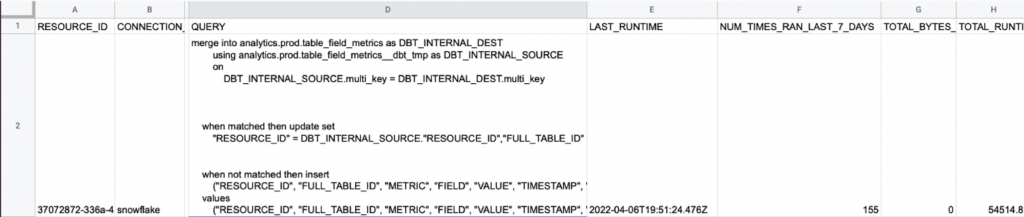
Snowflake has documented a helpful query to determine the most expensive queries ran in the last 30 days.
Monte Carlo Data Observability Insights is available in the Snowflake Data Marketplace and makes reports on an organization’s data health easily available as tables within their Snowflake environment to build custom workflows and dashboards.
This includes helpful Insight Reports such as deteriorating queries which automatically identifies queries taking longer and longer to complete indicating scale or performance issues that may precede an incident and heavy queries which automatically identifies the top 5 queries with the longest runtime and most bytes scanned.
Step 3: Snowflake table optimization
Querying large tables can get expensive. Deprecating unused tables is not only a helpful Snowflake cost optimization strategy, it can make it easier for your data consumers to find what they need.
Search optimization service vs table clustering, and materialized views
All three of these native Snowflake features can make querying large tables more efficient in both time and credit consumption. They all work slightly differently and are best used for different use cases.
Micro-partitions happen naturally in the order data is ingested into Snowflake, but over time that might not occur in a way that is optimized to how the data is routinely queried. Table clustering solves that by defining a cluster key that co-locates similar rows in the same micro-partitions.
This is another area where you don’t want to get crazy and cluster all, or even most, of your tables–it won’t be cost efficient. Large tables (say 3 terabytes or more) that are not updated often, but have frequent queries selecting a smaller set of rows or that sort the data, are primary candidates for table clustering.
If you are migrating to Snowflake, you will want to use a tool like Monte Carlo to document and analyze your current schema and lineage to make sure its structure and corresponding upstream sources and downstream consumers make sense for how your data will be partitioned and used once migrated to Snowflake. It can also help ensure you are selecting the appropriate cluster keys.
Now let’s say you have a large table with billions of rows where the entire table gets queried often for specific information (or at least parts that aren’t clustered). Think of this use case as needing to get all the associated information around one particular object–say all the financial transactions for a given user or all the coupon usage on a specific product.
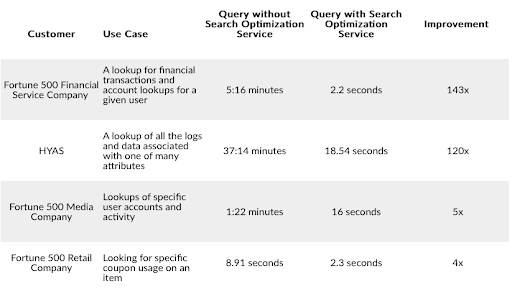
This is where the newer search optimization service can come in handy, especially for queries running more than tens of seconds and returning at least 100k-200k values.
Before you ask, yes this is technically Snowflake query optimization, but we’ve placed it in this section because the action is taken on the table. When you add this serverless feature to the table, the maintenance service creates the optimal search path across the data needed to perform the lookups.
A materialized view, available in the Enterprise Edition, is a pre-computed data set stored for later use. This feature is also an effective Snowflake cost optimization strategy when running frequent or complex queries on a subsection of large data sets.
Snowflake recommends leveraging a materialized view when:
- The query results from the view don’t change often. This almost always means that the underlying/base table for the view doesn’t change often, or at least that the subset of base table rows used in the materialized view don’t change often.
- The results of the view are used often (typically significantly more often than the query results change).
- The query consumes a lot of resources. Typically, this means that the query consumes a lot of processing time or credits, but it could also mean that the query consumes a lot of storage space for intermediate results.
Monte Carlo has recently introduced key field and unused field reports that can also be used to help prune overly large tables with significant query history.
Unused tables
Disposing of unused data tables would seem to be an easy Snowflake cost optimization win, but data engineers tend to be data hoarders.
Part of it is superstition that the minute a table is deleted, a data consumer will demand access to it. But the biggest reason is that table importance and usage is often hazy as a result of the all too common chasm between data engineer and data consumer.

Automated discovery and lineage features in Monte Carlo can help add the clarity the data team needs to gather the courage to dispose. Monte Carlo also has a number of Insight reports such as key assets, table read/write activity, and clean up suggestions that can identify your most important tables based on usage.
“That’s the beauty of Monte Carlo because it allows us to see who is using data and where it is being consumed. This has allowed us to actually free up some of our processing time from unused data elements which no one was using anymore and were no longer relevant,” said Valerie Rogoff, director of analytics data architecture at ShopRunner.
Take your Snowflake cost optimization journey one step at a time
The business adage goes, “Do you want it done fast, good, or cheap? Pick two.”
As a data professional moving slowly is rarely an option, and there is no compromising on data quality–bad data is too expensive no matter the price.
As a result Snowflake cost optimization sometimes gets the short shrift–and that’s OK. Snowflake is an efficient technology and getting more cost effective every year.
However, following these Snowflake cost optimization best practices can ensure you minimize waste and put your resources to good use–just don’t get too crazy about it.
Interested in how data observability can help you spot inefficiencies in your data stack? Book a time to speak with us in the form below.
Our promise: we will show you the product.
Read more posts.